How Do I Make Homemade Pizza Dough?
This post will walk you through every step of creating your own pizza dough, from comprehending the ingredients to perfecting the methods, so you may have delectable, handmade pizza every night of the week.
Being Aware of the Ingredients
Understanding the fundamental ingredients and their functions in the dough-making process is crucial when preparing pizza dough. Flour, water, yeast, salt, and occasionally sugar and olive oil are the basic ingredients. The texture of your pizza crust can be significantly influenced by the type of flour you use; while all-purpose flour is frequently used, bread flour, which has more protein, can produce a crust that is chewier and more elastic. While salt adds taste and fortifies gluten, which helps the dough take shape, yeast is the leavening ingredient that causes the dough to rise. Olive oil enhances the dough’s flavor and texture, while sugar can aid in yeast activation and baking browning. You can better comprehend the science underlying pizza dough and make wise decisions during the preparation process if you are aware of these substances.
Selecting the Proper Flour

Making the correct flour choice is essential to getting the texture and flavor you want in your pizza dough. Although all-purpose flour is a flexible option, bread flour’s higher protein content can improve the crust’s chewiness and flexibility. Use whole wheat flour or a combination of whole wheat and all-purpose flour if you want a more rustic taste. There are specific gluten-free flour blends that can be used effectively for pizza dough if you’re searching for a gluten-free alternative. It’s crucial to measure your flour precisely, regardless of the type you select. A kitchen scale may help guarantee accuracy because the weight of flour might change depending on how it’s placed in a measuring cup. Knowing the differences between the various types of flour will enable you to choose the ideal one for your homemade pizza dough.
Yeast Activation

A crucial component of pizza dough is yeast, which must be properly activated to produce the ideal rise. Active dry yeast and quick yeast are the two varieties of yeast that are frequently used in pizza dough. To assist feed the yeast and promote its bloom, active dried yeast must be dissolved in warm water (approximately 110°F or 43°C) with a small amount of sugar. Let the liquid sit for five to ten minutes, or until it starts to foam, which is a sign that the yeast is working. However, without first activating, instant yeast can be added straight to the dry ingredients. Whichever kind you decide on, make sure your yeast is fresh because it won’t give you the desired rise if it’s expired. Making a light and airy pizza crust requires knowing how to correctly activate yeast.
Putting the Dough Together

Mixing the dough is the next step after your yeast has been active. To make a well in the middle for the wet ingredients, mix the flour and salt together in a large mixing basin. Add the olive oil and any other ingredients to the well after adding the activated yeast mixture. Mix the ingredients with your hands or a wooden spoon until a shaggy dough forms. Just make sure the flour is mixed in and there are no dry areas left. Don’t overmix at this point. Following the initial mixing, you can move the dough to a surface dusted with flour and knead it by hand for eight to ten minutes. The gluten that gives the dough its structure and flexibility is developed during kneading. For the dough to maintain its shape and rise correctly throughout baking, this step is essential.
Methods of Kneading
A vital stage in creating pizza dough is kneading, which creates the gluten required for a pleasing texture. Start by pressing the dough down with the heel of your hand, then fold it over itself and give it a quarter turn to knead it. To avoid sticking, repeat this procedure with a small amount of flour added as necessary. Making a smooth, elastic dough that bounces back when prodded is the aim. The technique is made simpler if you use a stand mixer and knead using the dough hook attachment. The dough should be smooth and elastic after 5 to 7 minutes of low speed mixing. No matter how you knead it, the dough should be manageable and supple without being sticky. Your pizza dough will be much better if you can perfect the kneading process.
The Initial Ascent
It’s time for fermentation, or the first rise, after kneading. To keep the dough from drying out, put it in a bowl that has been lightly greased and cover it with plastic wrap or a moist towel. Until the dough has doubled in size, which normally takes one to two hours, it must rise in a warm, draft-free environment. This procedure enables the yeast to ferment, resulting in the production of alcohol and carbon dioxide, which enhance the flavor and texture of the dough. If you’re pressed for time, you can expedite the rising process by putting the dough next to a warm stove or in a relatively warm oven with the light on. A light and airy crust depends on the dough being given enough time to rise, so have patience. Keeping an eye on the dough at this point will help you get the outcome you want.
Forming the Dough
It’s time to form the dough into pizza bases when it has risen. To avoid big bubbles before baking, start by gently pushing down the dough to remove any trapped air. Divide the dough into equal sections according to the size of the pizzas you wish to make after transferring it to a lightly floured surface. A amount of roughly 10 to 12 ounces is ideal for a typical pizza. Tuck the edges of each portion under to form a smooth top and form each portion into a ball. To relax the gluten and make it easier to stretch, let the dough balls rest for 15 to 30 minutes. Depending on the thickness you want, you can use a rolling pin or your hands to gently stretch the dough when it’s time to shape. Achieving an even crust that cooks consistently requires careful sculpting.
Getting the Toppings Ready
Make sure your oven is preheated to its maximum temperature, which is normally between 475°F and 500°F (245°C and 260°C), before you add toppings to your pizza. To get a crispy crust, the oven must be hot. To make sure the pizza stone is heated all the way through, put it in the oven while it preheats. Get your toppings ready while the oven is heating up. Having everything you need on hand will make the procedure go more smoothly, regardless of your preference for traditional tomato sauce and mozzarella or something more daring. To cut down on moisture and avoid a soggy crust, think about pre-cooking any raw toppings, such as meats or veggies. Once the dough is ready, you can quickly assemble and bake your pizza if you prepare your toppings beforehand.
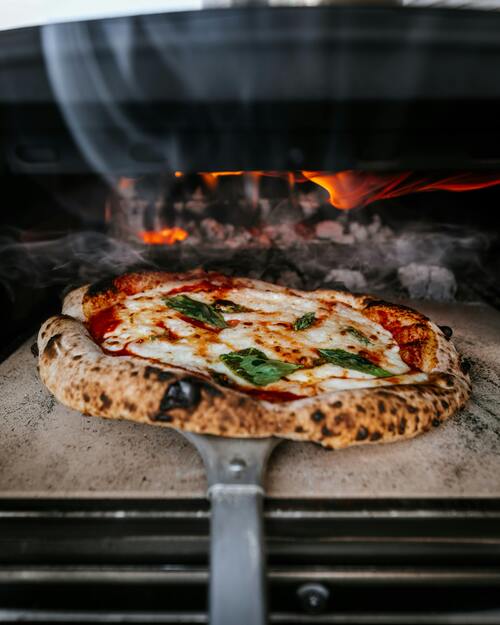
Making the Pizza
It’s time to bake the pizza after the dough has been formed and topped. Using a pizza peel or an inverted baking sheet sprinkled with flour or cornmeal, carefully move the pizza onto the hot pizza stone. Just put the baking sheet in the oven if you’re using one. The pizza should be baked for ten to fifteen minutes, or until the cheese is bubbling and beginning to brown and the crust is golden brown. Because oven times might vary, keep an eye on the pizza while it bakes. Rotate the pizza or lower the temperature a little if you notice that the crust is browning too soon. For the pizza to have the ideal ratio of melted toppings to crispy crust, baking it correctly is essential.
Serving and Cooling
After the pizza is perfectly cooked, take it out of the oven and allow it to cool for a few minutes before cutting into slices. The cheese is able to somewhat solidify during this resting time, which facilitates cutting and keeps toppings from slipping off. Depending on your choice, cut the pizza into squares or wedges using a chef’s knife or a sharp pizza cutter. For extra taste, top the pizza with fresh herbs like oregano or basil and serve it hot. Savor your handmade pizza with a simple salad to balance the meal or sides of marinara sauce for dipping. Everyone will enjoy the happy meal you prepare when you share your handmade pizza with friends and family.
In conclusion
Making your own pizza dough is a fun and rewarding way to add creativity and individuality to your meals. You can make a tasty and fulfilling pizza crust that is the ideal base for your preferred toppings by comprehending the supplies, becoming proficient with the methods, and following the instructions provided in this article. Every stage of the process, from choosing the proper flour and enabling the yeast to forming the dough and baking the pizza, adds to the overall caliber and taste of the finished dish. Your homemade pizza will be a favorite with everyone, whether you’re organizing a pizza party or just enjoying a relaxed family supper. Accept the artistry of pizza making and relish the fun of creating your own dough, knowing that every mouthful reflects your ingenuity and culinary effort.